Design Android App Top Ba
How to Create Custom AppBar/ActionBar/ToolBar in Android Studio | Java
![]()

Today in this tutorial, we're going to see how to create a custom AppBar/ActionBar/ToolBar in android.
I also already created a tutorial on this topic, but here I will demonstrate it with different examples.
Gradle dependency
for circle image view:
          dependencies {
            implementation 'de.hdodenhof:circleimageview:3.1.0'
}
Set the styles
now go to your styles.xml file and set the theme to NoAction Bar so that we can create our own toolbar.
          <resources>                      <!-- Base application theme. -->
            <style name="AppTheme" parent="Theme.AppCompat.Light.NoActionBar">
            <!-- Customize your theme here. -->
            <item name="colorPrimary">@color/black</item>
            <item name="colorPrimaryDark">@color/black</item>
            <item name="colorAccent">@color/white</item>
            </style>          </resources>
Design our AppBar/ActionBar/ToolBar
now go to your main XML file and create a ToolBar and set the width and height, make sure min-height should be actionBar size.
          <?xml version="1.0" encoding="utf-8"?>
<androidx.constraintlayout.widget.ConstraintLayout xmlns:android="http://schemas.android.com/apk/res/android"
            xmlns:tools="http://schemas.android.com/tools"
            android:layout_width="match_parent"
            android:layout_height="match_parent"
            xmlns:app="http://schemas.android.com/apk/res-auto"
            tools:context=".MainActivity"
            android:background="@color/white">                      <com.google.android.material.appbar.AppBarLayout
            app:layout_constraintStart_toStartOf="parent"
            app:layout_constraintTop_toTopOf="parent"
            app:layout_constraintEnd_toEndOf="parent"
            android:layout_width="match_parent"
            android:layout_height="wrap_content">                      <androidx.appcompat.widget.Toolbar
            android:layout_width="match_parent"
            android:layout_height="wrap_content"
            android:id="@+id/toolbar"
            android:background="@color/black"
            android:minHeight="?attr/actionBarSize"
            android:theme="@style/AppTheme.PopupOverlay">
            </androidx.appcompat.widget.Toolbar>                      </com.google.android.material.appbar.AppBarLayout>          </androidx.constraintlayout.widget.ConstraintLayout>
this will give you just a toolbar without any field. Look at the below image.
- Let's add a Logo
for the logo, we're using a circular image view. Already add the dependency. Put it inside the toolbar and do the adjustment.
          <?xml version="1.0" encoding="utf-8"?>
<androidx.constraintlayout.widget.ConstraintLayout xmlns:android="http://schemas.android.com/apk/res/android"
            xmlns:tools="http://schemas.android.com/tools"
            android:layout_width="match_parent"
            android:layout_height="match_parent"
            xmlns:app="http://schemas.android.com/apk/res-auto"
            tools:context=".MainActivity"
            android:background="@color/white">                      <com.google.android.material.appbar.AppBarLayout
            app:layout_constraintStart_toStartOf="parent"
            app:layout_constraintTop_toTopOf="parent"
            app:layout_constraintEnd_toEndOf="parent"
            android:layout_width="match_parent"
            android:layout_height="wrap_content">                      <androidx.appcompat.widget.Toolbar
            android:layout_width="match_parent"
            android:layout_height="wrap_content"
            android:id="@+id/toolbar"
            android:background="@color/black"
            android:minHeight="?attr/actionBarSize"
            android:theme="@style/AppTheme.PopupOverlay">                      <de.hdodenhof.circleimageview.CircleImageView
            android:layout_width="50dp"
            android:layout_height="50dp"
            android:src="@drawable/logo"
            android:padding="8dp"
            android:id="@+id/circle_imageView"/>
            </androidx.appcompat.widget.Toolbar>                      </com.google.android.material.appbar.AppBarLayout>          </androidx.constraintlayout.widget.ConstraintLayout>
here we set our title to null, so in the main java file assign our toolbar and do the below change
          package com.codewithgolap.appbar;                    import androidx.annotation.NonNull;
            import androidx.appcompat.app.AppCompatActivity;
            import androidx.appcompat.widget.Toolbar;                    import android.os.Bundle;                    public class MainActivity extends AppCompatActivity {                      Toolbar toolbar;                                            @Override
            protected void onCreate(Bundle savedInstanceState) {
            super.onCreate(savedInstanceState);
            setContentView(R.layout.activity_main);                                            toolbar = findViewById(R.id.toolbar);
            toolbar.setTitle("");
            setSupportActionBar(toolbar);;
            }
}
the result will be:

we can also set the logo by using app:logo="your logo here" in your toolbar
          <?xml version="1.0" encoding="utf-8"?>
<androidx.constraintlayout.widget.ConstraintLayout xmlns:android="http://schemas.android.com/apk/res/android"
            xmlns:tools="http://schemas.android.com/tools"
            android:layout_width="match_parent"
            android:layout_height="match_parent"
            xmlns:app="http://schemas.android.com/apk/res-auto"
            tools:context=".MainActivity"
            android:background="@color/white">                      <com.google.android.material.appbar.AppBarLayout
            app:layout_constraintStart_toStartOf="parent"
            app:layout_constraintTop_toTopOf="parent"
            app:layout_constraintEnd_toEndOf="parent"
            android:layout_width="match_parent"
            android:layout_height="wrap_content">                      <androidx.appcompat.widget.Toolbar
            android:layout_width="match_parent"
            android:layout_height="wrap_content"
            android:id="@+id/toolbar"
            android:background="@color/black"
            android:minHeight="?attr/actionBarSize"
            app:logo="@drawable/ic_baseline_menu_24"
            android:theme="@style/AppTheme.PopupOverlay">                      <TextView
            android:layout_width="wrap_content"
            android:layout_height="wrap_content"
            android:text="@string/app_title"
            android:textSize="17sp"
            android:gravity="center_vertical"
            android:fontFamily="@font/product_sans_regular"
            android:textColor="@color/white"
            android:layout_marginStart="20dp"
            />
            </androidx.appcompat.widget.Toolbar>                      </com.google.android.material.appbar.AppBarLayout>          </androidx.constraintlayout.widget.ConstraintLayout>
the result will be:

- Now, add a title and a menu
for the menu, create a menu android resource folder and create a menu resource file (/res/menu/custom_menu.xml)
          <?xml version="1.0" encoding="utf-8"?>
<menu xmlns:android="http://schemas.android.com/apk/res/android"
            xmlns:app="http://schemas.android.com/apk/res-auto">
            <item
            android:id="@+id/nav_search"
            android:title="@string/search"
            app:showAsAction="ifRoom"
            android:icon="@drawable/ic_baseline_search_24"/>
            <item
            android:id="@+id/nav_settings"
            android:title="@string/settings"
            app:showAsAction="ifRoom"
            android:icon="@drawable/ic_baseline_settings_24"/>              </menu>
import that menu in our main java file by using these code of lines
          @Override
public boolean onCreateOptionsMenu(Menu menu) {
            getMenuInflater().inflate(R.menu.custom_menu            ,menu);
            return super.onCreateOptionsMenu(menu);
            }          @Override
public boolean onOptionsItemSelected(@NonNull MenuItem item) {
            if (item.getItemId() == R.id.nav_search){
            Toast.makeText(this,            "Click Search Icon.",            Toast.LENGTH_SHORT).show();
            }
            else if (item.getItemId() == R.id.nav_settings){
            Toast.makeText(this,            "Clicked Settings Icon..",            Toast.LENGTH_SHORT).show();
            }
            return super.onOptionsItemSelected(item);
            }
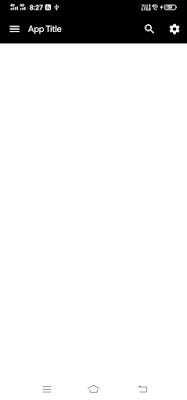
for adding a title simply add a textView inside the toolbar.
          <?xml version="1.0" encoding="utf-8"?>
<androidx.constraintlayout.widget.ConstraintLayout xmlns:android="http://schemas.android.com/apk/res/android"
            xmlns:tools="http://schemas.android.com/tools"
            android:layout_width="match_parent"
            android:layout_height="match_parent"
            xmlns:app="http://schemas.android.com/apk/res-auto"
            tools:context=".MainActivity"
            android:background="@color/white">                      <com.google.android.material.appbar.AppBarLayout
            app:layout_constraintStart_toStartOf="parent"
            app:layout_constraintTop_toTopOf="parent"
            app:layout_constraintEnd_toEndOf="parent"
            android:layout_width="match_parent"
            android:layout_height="wrap_content">                      <androidx.appcompat.widget.Toolbar
            android:layout_width="match_parent"
            android:layout_height="wrap_content"
            android:id="@+id/toolbar"
            android:background="@color/black"
            android:minHeight="?attr/actionBarSize"
            android:theme="@style/AppTheme.PopupOverlay">                      <de.hdodenhof.circleimageview.CircleImageView
            android:layout_width="50dp"
            android:layout_height="50dp"
            android:src="@drawable/logo"
            android:padding="8dp"
            android:id="@+id/circle_imageView"/>                      <TextView
            android:layout_width="wrap_content"
            android:layout_height="wrap_content"
            android:text="@string/app_title"
            android:textSize="17sp"
            android:gravity="center_vertical"
            android:fontFamily="@font/product_sans_regular"
            android:textColor="@color/white"
            android:layout_marginStart="20dp"
            />
            </androidx.appcompat.widget.Toolbar>                      </com.google.android.material.appbar.AppBarLayout>          </androidx.constraintlayout.widget.ConstraintLayout>
the result will be:

Follow me on IG and FB
IG: @androidapps.developement.blogs
FB: GBAndroidBlogs
Design Android App Top Ba
Source: https://medium.com/swlh/how-to-create-custom-appbar-actionbar-toolbar-in-android-studio-java-61907fa1e44
Posted by: cabreraaltatter.blogspot.com

0 Response to "Design Android App Top Ba"
Post a Comment